Author: Article999

  • Ventilators: How?

    Ventilators: How?

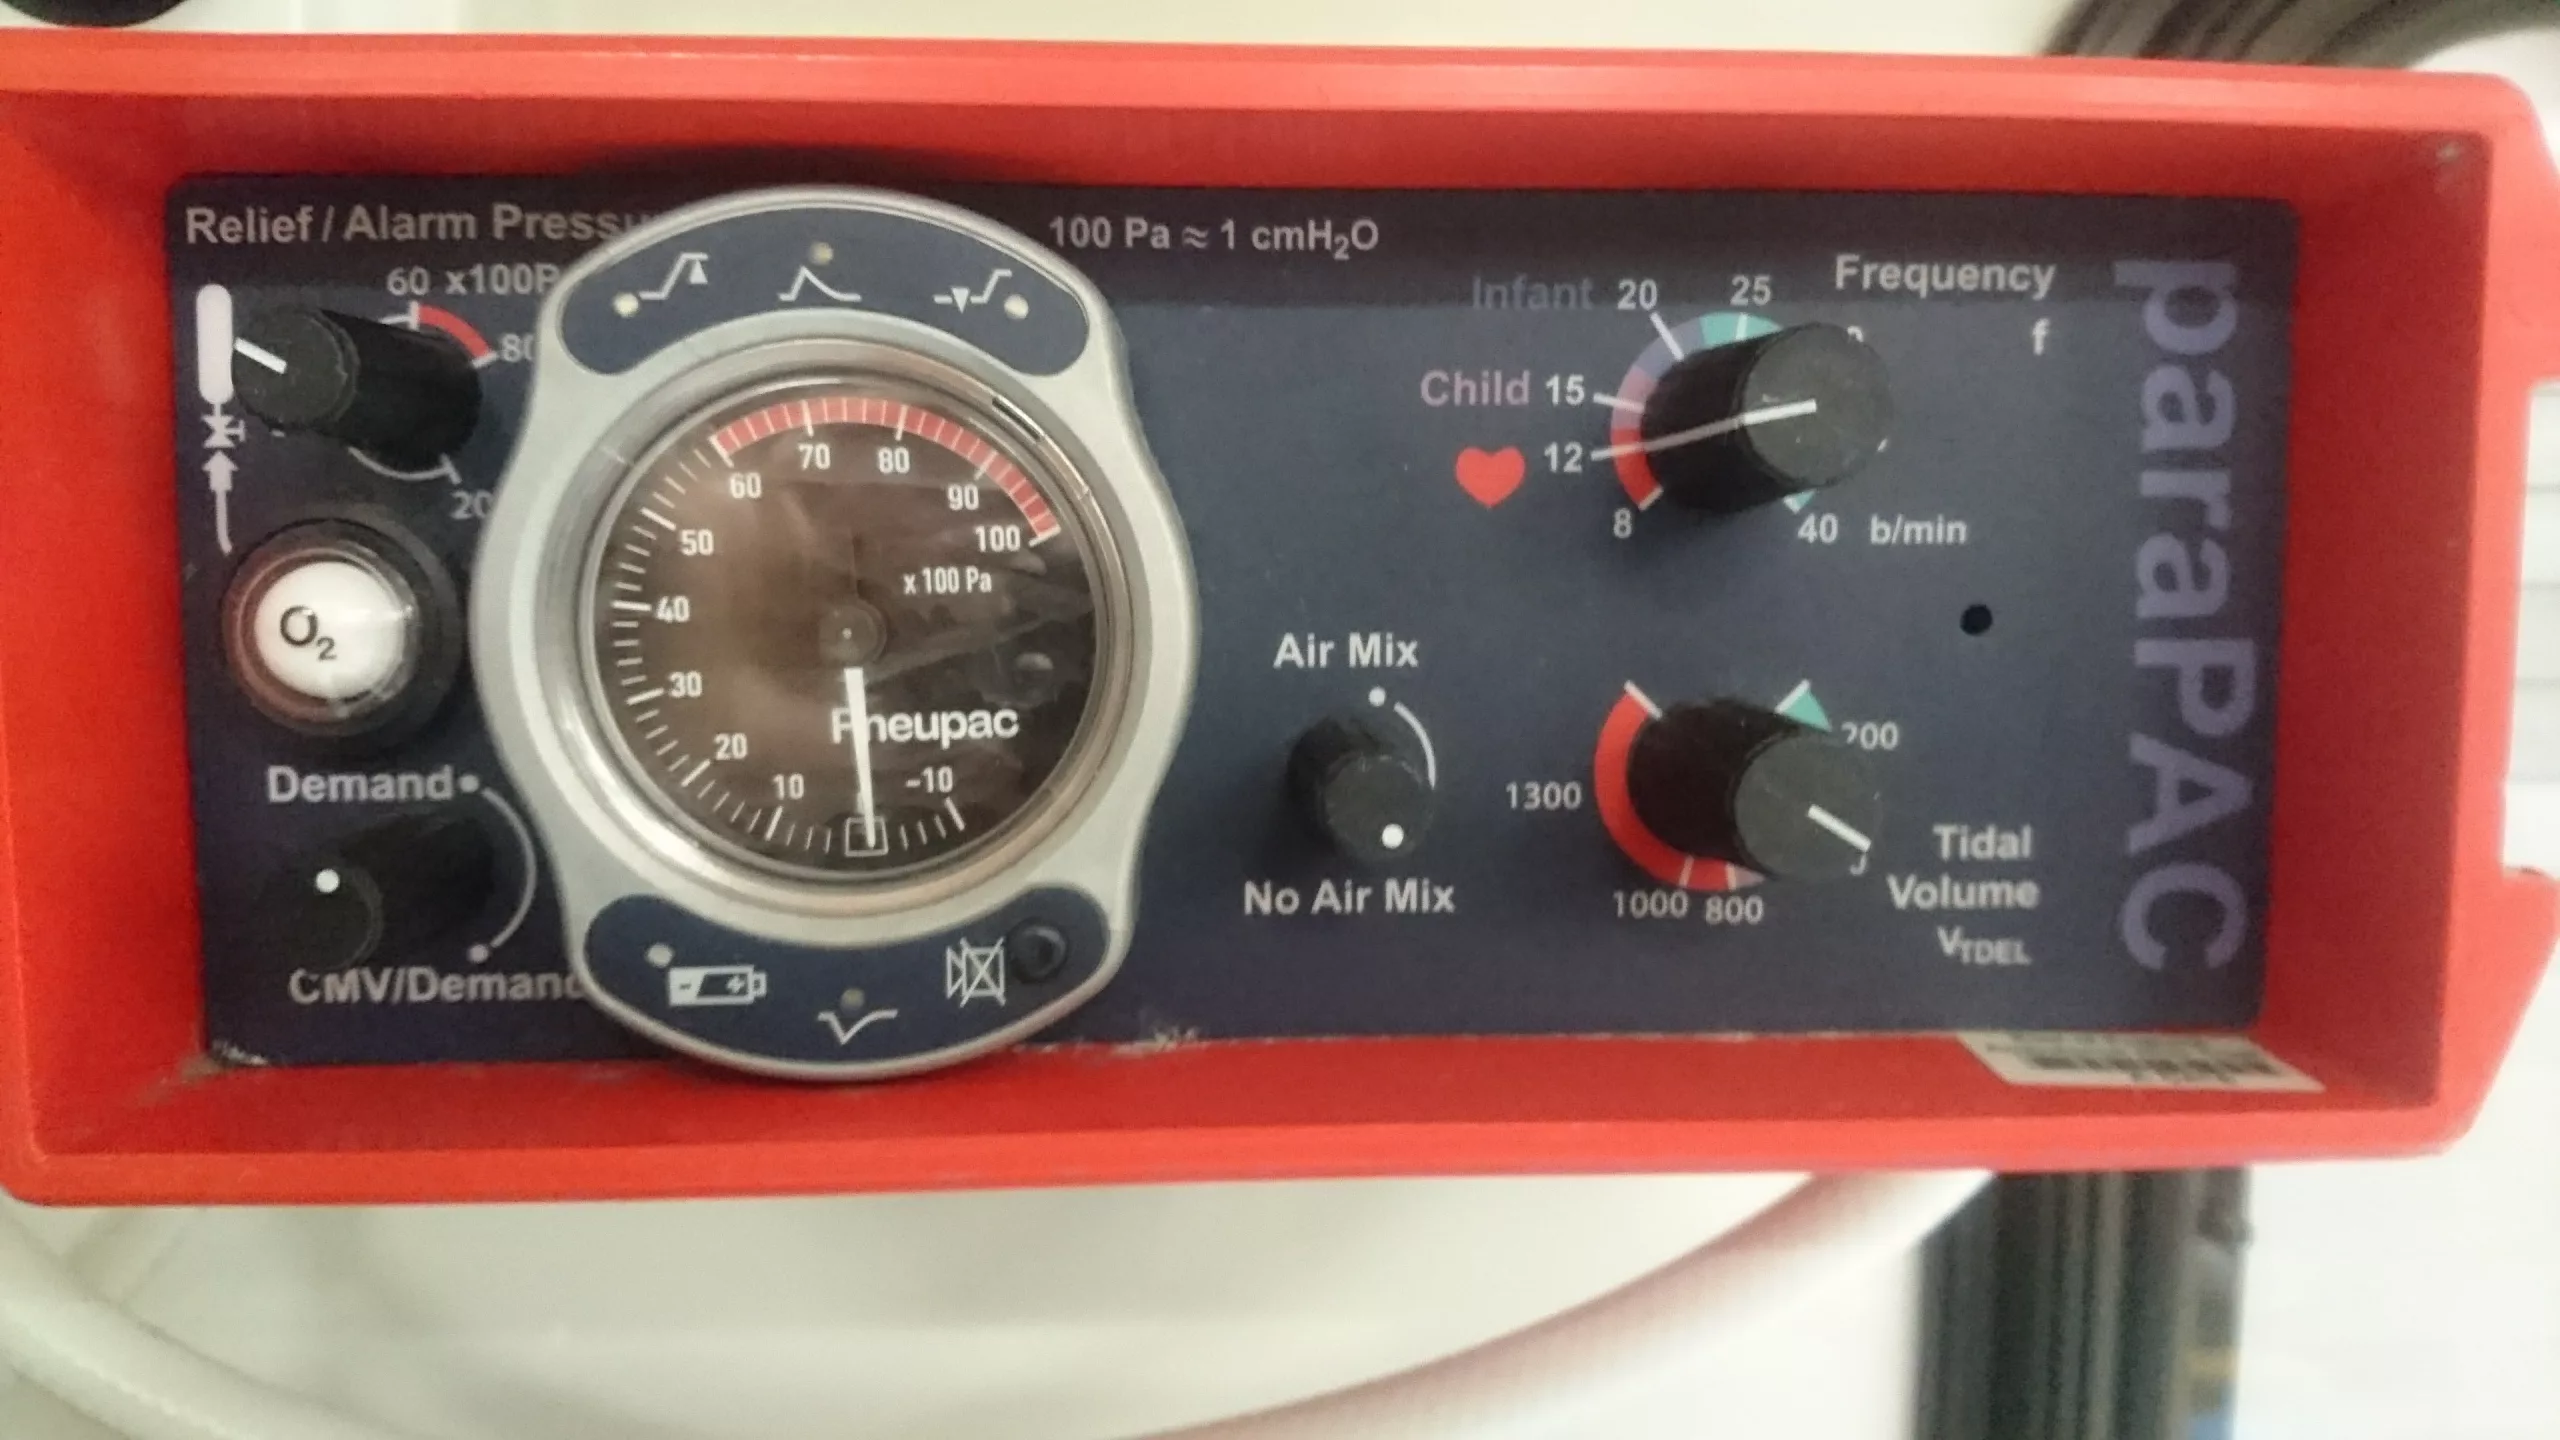
    A shorter version of Ventilators: Why, What, How, When? featuring how-to use the ventilator demonstrations only. Made by UK Paramedics, this demonstrates how to use the PneuPac ParaPac ventilator.

    Read more:

    Ventilators: Why, What, How, When?

    How do I get the ventilator off the racks?

    What is the relief pressure dial on the ventilator?

    The Discovery of Negative and Positive Pressure Ventilation – Fast Fact

    What is positive pressure breathing?

    What is Negative Pressure Breathing?

    Disclaimer

    You must read the full disclaimer at www.article999.co.uk/about/ (disclaimer tab) before putting into place anything you see here. Useful information is available in the text on this video, so if you only listen to the narration you will miss important facts. The ventilation settings mentioned in this video are what is recommended by Smiths Medical, current guidelines and some articles – however, as with all topics, there is always varying information available online & alternative expert advice, and no video can cater for all of that. Similarly, this video is intended to demonstrate how to use equipment & to introduce or remind you to the Why, What and When of ventilators – not to tell you that you should or shouldn’t be using it. That is dependent on local guidelines, your research & your choice as a clinician. This video merely highlights the varying advice regarding tidal volume settings, and in the text points out the potential problems with some of the figures. No specific volume is recommended.


    Transcript

    Article 999. Ventilators: Why, What, How, When?

    This video has been made by UK Paramedics following guidelines. It is not endorsed by any author, organisation or Ambulance Trust. You must read the full disclaimer at www.article999.co.uk/about/ and refer to your local guidelines before putting into place anything you see here. This video is intended to demonstrate how to use the ventilator according to use guides and guidelines – not to tell you that you should or shouldn’t use it. That decision is up to you and should be dependent on local guidelines and your own research. This is what the textbooks, the manufacturer and a few articles say & is not intended to represent the expert opinions or experience of others within healthcare.

    Remember hand hygiene, bare below the elbows and gloves in real life.


    How?

    1. To remove the ventilator from the racks, pull the flap to the side and push the ventilator up. To put it back in, simply push it down and pull the flap to the side again.
    2. To connect to the gas supply, push the hose into the socket and twist. It’s the same when connecting to a portable oxygen cylinder.
    3. When you turn it on, the ventilator should complete a self check. The alarm lights should flash in sequence, there should be one burst of the high pressure audible alarm, and the orange indicator should flash for 60 seconds.
    4. Next, check the indicator shows white for O2.
    5. Connect the patient circuit [shown in video].
    6. Next on the list, adjust the ventilation parameters. Set the air mix control to no air mix for respiratory arrest or CPR. Set the relief pressure control to 40. Set the respiratory rate to 12. As for the tidal volume, it varies massively as you can see on the screen. It depends on whether you opt for an average value or base it on the patient’s weight. Smiths Medical (2017) advise 800-900ml on their training video, [but this may not be advisable] but don’t worry too much about the slight differences in tidal volume because the PneuPac features a high pressure alarm that we’ll discuss shortly. The alarm will help you identify if the tidal volume is too high for your patient.

    (Gregory & Mursell, 2010: 44; Pilbery & Lethbridge, 2016: 189; Baker, 2012; Smiths Medical, 2017)

    The following demonstrate the variance in researched texts and guidelines – not necessarily the advised settings:

    400-600ml Baskett, 1996
    500-600ml Perkins et al, 2015
    600ml Baker, 2016
    800-900ml Smiths Medical, 2017 – may not be advisable due to risks of barotrauma. See below
    6-8ml/kg Bocklage & Balk, 2017; Frakes, 2007
    10ml/kg or 5-8ml/kg Baker, 2012 – depending on the extent of the risk of barotrauma

    7. Next, temporarily occlude the patient connection. The relief pressure monitor should go to the maximum setting – i.e. 40cmh20.

    (Gregory & Mursell, 2010: 44; Pilbery & Lethbridge, 2016: 189; Baker, 2012; Smiths Medical, 2017)


    What do the audible warnings mean?

    • Top left is the high pressure alarm
    • Top right is low pressure
    • Bottom left is the battery indicator
    • The middle one tells you when breathing is detected by the ventilator

    (Smiths Medical, 2017)

    High pressure = excessive tidal volume, incorrect airway position, kinked ET tube, or incorrect ventilation settings.
    If the pressure is reaching it’s max, there may be something wrong with the circuit.

    If you’ve checked the above and the alarm is still sounding, Smiths Medical (2017) advise that your tidal volume setting might simply be too high.

    Low pressure = leakage or insufficient tidal volume/settings, faulty valve in the patient’s circuit
    This alarm tends to occur when pressure drops below 10cmh20

    Earlier, I pointed out the alarm in the middle, at the bottom. This is SMMV. It’s an indicator that will flash green if the patient is breathing for themselves. The ventilator will assist if the patient breathes with less than 150ml of tidal volume. Between 150-400ml the ventilator will extent the exhalation time to allow the patient to complete their own breath, and above 400ml the ventilator will allow the patient to breathe and will not assist, but may still assist on the next breath if required (Smiths Medical, 2017; Baker, 2012).


    Extra facts:

    McCarty et al (2012) found that ‘ventilation rates and tidal volumes commonly exceeded Guideline recommendations. This resulted in […] excessive mean airway pressure’

    Smiths Medical (2017) advise that peak inflation pressure should be below 20cmh20 when using a mask to ventilate due to the issues of too high pressure

    Inspiration to Expiration should be 1:2 (Smiths Medical, 2017; Baker, 2012)

    References

    Baker, D. 2012. Emergency and Transport Ventilation, an introductory guide, Smiths Medical International Limited: Luton

    Baker, D.J. 2016. Artificial Ventilation: A Basic Clinical Guide. Springer International: Switzerland

    Baskett, P. et al. 1996. ‘Tidal volumes which are perceived to be adequate for resuscitation’, Resuscitation, 31 (3), pp. 231-4

    Bocklage, T. & Balk, R.A. 2017. Setting the Tidal Volume In Adults Receiving Mechanical Ventilation: Lessons

    Learned From Recent Investigations, Available Online: https://www.nbrc.org/wp-content/uploads/2017/07/Setting-the-Tidal-Volume.pdf (Accessed 17/12/17)

    Frakes, M. 2007. Ventilation Modes and Monitoring, Available Online: http://www.rtmagazine.com/2007/02/ventilation-modes-and-monitoring/ (Accessed 17/12/17)

    Gregory, P. and Mursell, I. 2010. Manual of Clinical Paramedic Procedures, West Sussex: John Wiley & Sons

    McCarty, K. et al, 2012. Ventilation rates and tidal volume during emergency department cardiac resuscitation, Resuscitation, 83: 4, p45

    Owen, R. and Castle, M. 2006. ‘EtCO2: the key to effective prehospital ventilation’, Emergency Medical Journal, 23 (7), pp. 578-579

    Perkins, G.D. 2015. European Resuscitation Council Guidelines for Resuscitation 2015: Section 2. Adult basic life support and automated external defibrillation, Available Online: https://ercguidelines.elsevierresource.com/european-resuscitation-council-guidelines-resuscitation-2015-section-2-adult-basic-life-support-and/fulltext#back-bib0760 (Accessed 17/12/17)

    Pilbery, R. & Lethbridge, K. 2016. Ambulance Care Practice, Bridgwater: Class Professional Publishing

    Smiths Medical, 2017. ‘Pneupac – ParaPAC’, Pneupac Transport Ventilators – Breathe Easy, Available Online: https://www.smiths-medical.com/resources/pneupac-transport–ventilators—breathe-easy (Accessed 27/10/17)

    With thanks to Smiths Medical for their correspondence and information

    Music:
    Dobroide, 2010. 20091229.ambulance.siren.wav. Available Online: https://freesound.org/people/dobroide/sounds/8713/ (Accessed 21/08/17)

    Productiontrax.com

    Images:

    Article 999’s own or licenses purchased via Adobe Stock & Dreamstime


    Feedback is welcome & responded to. Stay tuned for more content!
     

    Displayed on one of our ‘Fast Facts’ pages. Click on the image for the link & reference!


  • Ventilators: Why, What, How, When?

    Ventilators: Why, What, How, When?

    Made by UK Paramedics, this video demonstrates how to use the PneuPac ParaPac ventilator.

    Read more:

    How do I get the ventilator off the racks?

    What is the relief pressure dial on the ventilator?

    What is positive pressure breathing?

    What is Negative Pressure Breathing?

    The Discovery of Negative and Positive Pressure Ventilation – Fast Fact

    Disclaimer

    You must read the full disclaimer at www.article999.co.uk/about/ (disclaimer tab) before putting into place anything you see here. Useful information is available in the text on this video, so if you only listen to the narration you will miss important facts. The ventilation settings mentioned in this video are what is recommended by Smiths Medical, current guidelines and some articles – however, as with all topics, there is always varying information available online & alternative expert advice, and no video can cater for all of that. Similarly, this video is intended to demonstrate how to use equipment & to introduce or remind you to the Why, What and When of ventilators – not to tell you that you should or shouldn’t be using it. That is dependent on local guidelines, your research & your choice as a clinician. This video merely highlights the varying advice regarding tidal volume settings, and in the text points out the potential problems with some of the figures. No specific volume is recommended.


    Transcript

    Article 999. Ventilators: Why, What, How, When?

    This video has been made by UK Paramedics following guidelines. It is not endorsed by any author, organisation or Ambulance Trust. You must read the full disclaimer at www.article999.co.uk/about/ and refer to your local guidelines before putting into place anything you see here. This video is intended to demonstrate how to use the ventilator according to use guides and guidelines – not to tell you that you should or shouldn’t use it. That decision is up to you and should be dependent on local guidelines and your own research. This is what the textbooks, the manufacturer and a few articles say & is not intended to represent the expert opinions or experience of others within healthcare.

    Remember hand hygiene, bare below the elbows and gloves in real life.

    Why use the ventilator?

    Research suggests that mechanical ventilators can reduce the variability of breath timings & as a result, capnography readings. They can also increase the likelihood of ‘effective ventilation’ (Owen and Castle, 2006)

    To quote from Gregory & Mursell (2010: 47) ‘A high flow rate over a short inflation time inevitably produces a high peak airway pressure in an unprotected airway [as with BVM technique]. High peak airway pressure overcomes the pressure of the lower oesophageal sphincter and causes gastric inflation. […] Use of […] mechanical ventilation may help to overcome the high pressures involved. […] In an intubated patient or a patient with an LMA in situ, use of a mechanical ventilator has been shown to allow paramedics to accomplish extra tasks, document better, and provide better patient care’ (Gregory & Mursell, 2010: 47)

    What?

    This is a time-cycled, volume preset flow generator (Baker, 2012). In other words, the pressure can vary, volume is always the same, and the air must be delivered within a preset time, which helps to control the tidal volume.

    There are many different types. One of the most common ones in UK ambulances at this time (Gregory & Mursell, 2010: 44) is the Pneupac paraPAC (Smiths Medical, 2017) but the ParaPac Plus may soon replace it.

    Here are the useful parts:

    The supply gas failure alarm
    The inlet connection
    The relief pressure control
    The ‘main pneumatic switch’
    Air mix control
    Inflation pressure monitor
    Frequency control
    Tidal volume control
    (Pilbery and Lethbridge, 2016: 189)

    How?

    1. To remove the ventilator from the racks, pull the flap to the side and push the ventilator up. To put it back in, simply push it down and pull the flap to the side again.
    2. To connect to the gas supply, push the hose into the socket and twist. It’s the same when connecting to a portable oxygen cylinder.
    3. When you turn it on, the ventilator should complete a self check. The alarm lights should flash in sequence, there should be one burst of the high pressure audible alarm, and the orange indicator should flash for 60 seconds.
    4. Next, check the indicator shows white for O2.
    5. Connect the patient circuit [shown in video].
    6. Next on the list, adjust the ventilation parameters. Set the air mix control to no air mix for respiratory arrest or CPR. Set the relief pressure control to 40. Set the respiratory rate to 12. As for the tidal volume, it varies massively as you can see on the screen. It depends on whether you opt for an average value or base it on the patient’s weight. Smiths Medical (2017) advise 800-900ml on their training video, [but this may not be advisable] but don’t worry too much about the slight differences in tidal volume because the PneuPac features a high pressure alarm that we’ll discuss shortly. The alarm will help you identify if the tidal volume is too high for your patient.

    (Gregory & Mursell, 2010: 44; Pilbery & Lethbridge, 2016: 189; Baker, 2012; Smiths Medical, 2017)

    The following demonstrate the variance in researched texts and guidelines – not necessarily the advised settings:

    400-600ml Baskett, 1996
    500-600ml Perkins et al, 2015
    600ml Baker, 2016
    800-900ml Smiths Medical, 2017 – may not be advisable due to risks of barotrauma. See below
    6-8ml/kg Bocklage & Balk, 2017; Frakes, 2007
    10ml/kg or 5-8ml/kg Baker, 2012 – depending on the extent of the risk of barotrauma

    7. Next, temporarily occlude the patient connection. The relief pressure monitor should go to the maximum setting – i.e. 40cmh20.

    (Gregory & Mursell, 2010: 44; Pilbery & Lethbridge, 2016: 189; Baker, 2012; Smiths Medical, 2017)


    What do the audible warnings mean?

    • Top left is the high pressure alarm
    • Top right is low pressure
    • Bottom left is the battery indicator
    • The middle one tells you when breathing is detected by the ventilator

    (Smiths Medical, 2017)

    High pressure = excessive tidal volume, incorrect airway position, kinked ET tube, or incorrect ventilation settings.
    If the pressure is reaching it’s max, there may be something wrong with the circuit.

    If you’ve checked the above and the alarm is still sounding, Smiths Medical (2017) advise that your tidal volume setting might simply be too high.

    Low pressure = leakage or insufficient tidal volume/settings, faulty valve in the patient’s circuit
    This alarm tends to occur when pressure drops below 10cmh20

    Earlier, I pointed out the alarm in the middle, at the bottom. This is SMMV. It’s an indicator that will flash green if the patient is breathing for themselves. The ventilator will assist if the patient breathes with less than 150ml of tidal volume. Between 150-400ml the ventilator will extent the exhalation time to allow the patient to complete their own breath, and above 400ml the ventilator will allow the patient to breathe and will not assist, but may still assist on the next breath if required (Smiths Medical, 2017; Baker, 2012).

    When?

    – AACE (2016) recommend considering ventilation if a ptn’s o2 sats <90 on high con o2,
    if the RR is <10 or >30 bpm or if there is ‘inadequate chest expansion’ (p42) but the mechanical ventilator is to be used …
    – for ’emergency and transport ventilation’ in 5kg + patients (Smiths Medical, 2017)

    Extra facts:

    McCarty et al (2012) found that ‘ventilation rates and tidal volumes commonly exceeded Guideline recommendations. This resulted in […] excessive mean airway pressure’

    Smiths Medical (2017) advise that peak inflation pressure should be below 20cmh20 when using a mask to ventilate due to the issues of too high pressure

    Inspiration to Expiration should be 1:2 (Smiths Medical, 2017; Baker, 2012)


    References

    Baker, D. 2012. Emergency and Transport Ventilation, an introductory guide, Smiths Medical International Limited: Luton

    Baker, D.J. 2016. Artificial Ventilation: A Basic Clinical Guide. Springer International: Switzerland

    Baskett, P. et al. 1996. ‘Tidal volumes which are perceived to be adequate for resuscitation’, Resuscitation, 31 (3), pp. 231-4

    Bocklage, T. & Balk, R.A. 2017. Setting the Tidal Volume In Adults Receiving Mechanical Ventilation: Lessons

    Learned From Recent Investigations, Available Online: https://www.nbrc.org/wp-content/uploads/2017/07/Setting-the-Tidal-Volume.pdf (Accessed 17/12/17)

    Frakes, M. 2007. Ventilation Modes and Monitoring, Available Online: http://www.rtmagazine.com/2007/02/ventilation-modes-and-monitoring/ (Accessed 17/12/17)

    Gregory, P. and Mursell, I. 2010. Manual of Clinical Paramedic Procedures, West Sussex: John Wiley & Sons

    McCarty, K. et al, 2012. Ventilation rates and tidal volume during emergency department cardiac resuscitation, Resuscitation, 83: 4, p45

    Owen, R. and Castle, M. 2006. ‘EtCO2: the key to effective prehospital ventilation’, Emergency Medical Journal, 23 (7), pp. 578-579

    Perkins, G.D. 2015. European Resuscitation Council Guidelines for Resuscitation 2015: Section 2. Adult basic life support and automated external defibrillation, Available Online: https://ercguidelines.elsevierresource.com/european-resuscitation-council-guidelines-resuscitation-2015-section-2-adult-basic-life-support-and/fulltext#back-bib0760 (Accessed 17/12/17)

    Pilbery, R. & Lethbridge, K. 2016. Ambulance Care Practice, Bridgwater: Class Professional Publishing

    Smiths Medical, 2017. ‘Pneupac – ParaPAC’, Pneupac Transport Ventilators – Breathe Easy, Available Online: https://www.smiths-medical.com/resources/pneupac-transport–ventilators—breathe-easy (Accessed 27/10/17)

    With thanks to Smiths Medical for their correspondence and information

    Music:
    Dobroide, 2010. 20091229.ambulance.siren.wav. Available Online: https://freesound.org/people/dobroide/sounds/8713/ (Accessed 21/08/17)

    Productiontrax.com

    Images:

    Article 999’s own or licenses purchased via Adobe Stock & Dreamstime


    Feedback is welcome & responded to. Stay tuned for more content!
     

    Displayed on one of our ‘Fast Facts’ pages. Click on the image for the link & reference!
  • How do I get the ventilator off the racks?

    How do I get the ventilator off the racks?

    If you’ve ever felt the frustration of being a student on Day 1 and having to retrieve the ventilator for your crewmate, you might enjoy this GIPHY.


  • What is the relief pressure dial on the ventilator?

    What is the relief pressure dial on the ventilator?

     This article refers to the workings of Smith’s Medical Pneupac ParaPac and the newer ParaPac Plus. Other transport ventilators may vary in their settings and processes. Please check what unit your ambulance trust has before following the information here.


    [tabby title=”Detail”]

    The pressure of air inside our lungs is normally just right to not only ensure that negative pressure breathing occurs but also to prevent a shunt (where blood bypasses the lungs) (Hess & Kackmarek, 2014: 431), the oesophageal spinchter from opening, causing air to enter the stomach (Baker, 2012: 1), and a host of other potential problems. Any means of supported ventilation where the patient is not breathing for themselves produces positive pressure ventilation. Not only does this change the way air enters the patient’s lungs while they are ventilated, but it also comes with all of the above risks if any of the settings are incorrect, and more.

    Many of the effects ‘are related to mean airway pressure [which is] […] the average pressure applied to the airway during the ventilatory cycle’ (Hess & Kackmarek, 2014: 420) With too ⇑ pressure comes ⇓ venous return (Hess & Kackmarek, 2014: 420) and ⇑ chance of barotrauma (Baker, 2016: 75).

    To summarise, the potential negative effects are:

    • Blood bypassing the lungs (a shunt) (Hess & Kackmarek, 2014: 431)
    • Air entering the stomach (Baker, 2012: 1)
    • Venous return decreasing (Hess & Kackmarek, 2014: 420)
    • Barotrauma (Baker, 2016: 75)

    Because modern ventilators are volume-controlled, preventing a different problem that occurs during pressure-controlled ventilation, there is a set tidal volume which the ventilator will always provide to the patient. To provide this volume, the pressure will constantly increase until the volume is reached (Baker, 2016: 132).

    The Means of Avoiding These Problems

    In ventilators, the pressure of an oxygen cylinder ‘is lowered through a reducing valve down to 30-90psi’ from 2000psi. It’s then delivered to the patient ‘to a maximum of 40cmh20 or 60cmh20’, (Baker, 2012: 18)*, depending on whether you’re in the UK or the US.

    *cmh20 = centimetres of water pressure (SensorsONE, 2017)

    Since we can’t have too much pressure there needs to be a way of stopping the ventilator if things get awry. The relief pressure is what this refers to. Via a safety valve (Baker, 2012), otherwise known as ‘exhaust valves’ the supply is cut and excess peak inspiratory pressure (PIP) is released into the atmosphere (Zaconeta et al, 2010), ‘prevent[ing] over-ventilation of the lungs’ (Baker, 2016: 145)

    Why would the pressure get this high anyway?

    • ‘The patient circuit […] [could be] blocked or kinked’ (Baker, 2016: 142). Best to check it.
    • ‘If the lung compliance[*] is low and the airway resistance is high the pressure can rise to high levels’ because, as above, the pressure will keep rising until the set tidal volume is delivered (Baker, 2016: 142).
    • The wrong relief pressure settings.

    *Compliance ‘refers to the ease of expansion of the lungs and the walls of the thorax’ (Baker, 2012: 8). Ordinarily, according to Baker (2012: 8), the value is 100 cmh20 but when ventilated it’s 40-50cmh20. Physical injuries and medical conditions may further alter this figure.

    Which dial are you talking about?

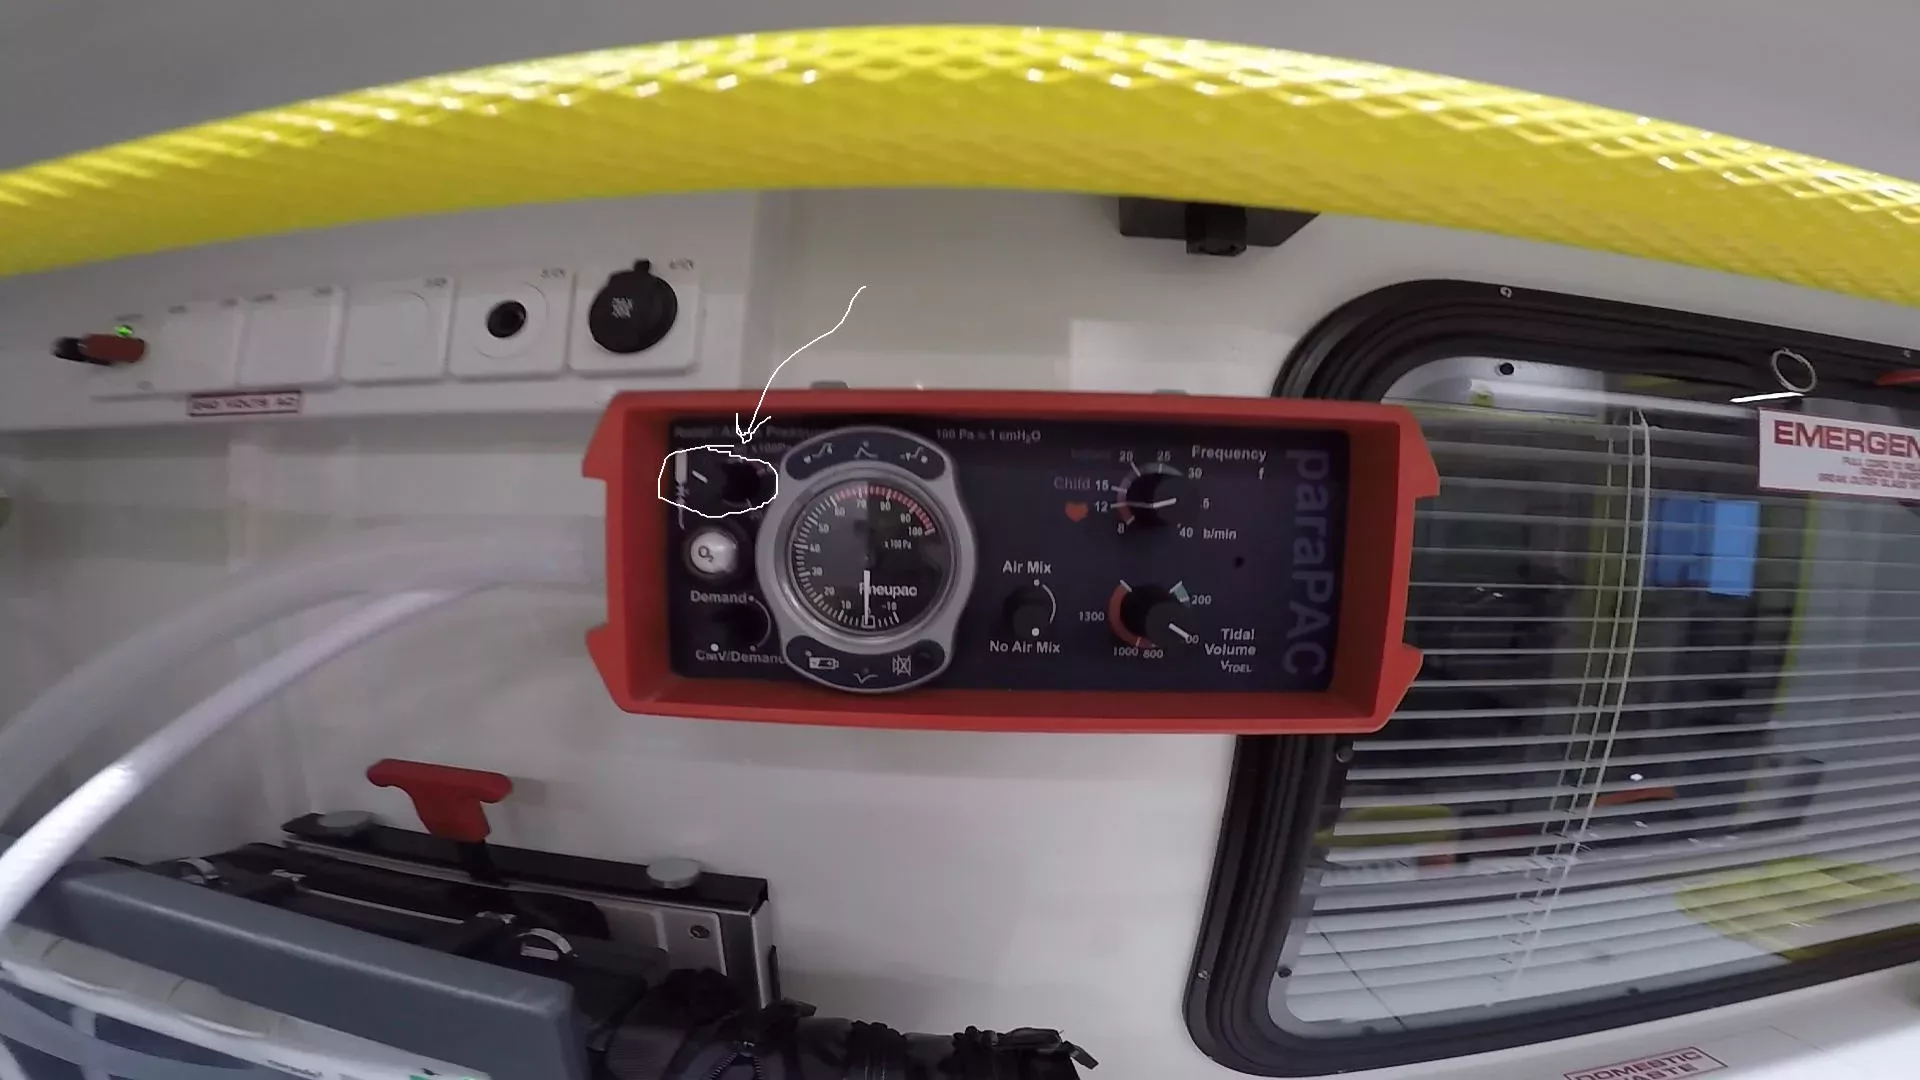
    This one

    The Pneupac ParaPac (Smiths Medical). Photo highlights the Relief Pressure dial.

    What should I set it to?

    40cmh20 if you’re in the UK (Baker, 2012)

    Why is the relief pressure set at 40cmh20 in the UK? Why is it 60cmh20 in the US?

    Article 999 is struggling to find the answers to these questions. If you know the answers, please get it touch. It would be great to add the information to this resource.

    This post is yet to be peer reviewed. Please get in touch if you have any comments.


    [tabby title=”Super Summary”]

    Article 999 previously posted an article on positive pressure ventilation, including its risks. The aim of positive pressure ventilation is to ‘maximise the potential benefit of mechanical ventilation while minimizing the potential for harm’ (Hess & Kackmarek, 2014: 407). The relief pressure dial on the ventilator ensures that the pressure of ventilation is not so high as to cause blood bypassing the lungs (Hess & Kackmarek, 2014: 407), the oesophageal spinchter opening (Baker, 2012: 1), barotrauma (Baker, 2016: 75; Hess & Kackmarek, 2014) and more. The ventilator’s other settings ensure that the patient actually receives ventilation, but the relief pressure setting ensures that a valve drains excess air when settings, poor setup, or the patient’s lung compliance (Baker, 2016: 43) have caused the pressure to get to high.

    What should I set it to?

    40cmh20 (Baker, 2012)

    What should I look out for if the pressure is too high?

    Kinked tubing (Baker, 2016: 142) & your settings

    Read more in the Detail tab.

    [tabby title=”Prefer to see a diagram? Check out the mind-map summary”]


    [tabby title=”References”]

    References

    Baker, D. 2012. Emergency and Transport Ventilation, an introductory guide, Smiths Medical International Limited: Luton

    Baker, D.J. 2016. Artificial Ventilation: A Basic Clinical Guide. Springer International: Switzerland

    Hess, D.R. & Kacmarek, R.M. 2014. Essentials of Mechanical Ventilation. McGraw Hill Education: New York

    SensorsONE, 2017. cmh20 – Centimetres of Water Column at 4 deg C Pressure Unit, Available Online: https://www.sensorsone.com/cmh2o-centimetres-water-column-4-deg-c-pressure-unit/ (Accessed 16/11/17)

    Zaconeta, C.A.M. et al, 2010. ‘Evaluation of peak inspiratory pressure and respiratory rate during ventilation of a preterm infant lung model with a self-inflating bag by paramedics of the Fire Department’, Revista Paulista de Pediatria, vol. 28. No. 1.

    Not endorsed by but with thanks to Smiths Medical for providing information.

    [tabbyending]


  • What is positive pressure breathing?

    What is positive pressure breathing?

    Positive pressure refers to the way artificial ventilation ‘inflate[s] the lungs’ (Hess & Kacmarek, 2014). ‘Normal breathing depends on drawing in air to the lungs by creating a partial vacuum inside the chest cavity’ (Baker, 2016: vi). The mean airway pressure, an average combined of ‘the amount and duration of pressure applied during’ expiratory and inspiratory phases in normal breathing is negative (Hess & Kacmarek, 2014: 420 ebook). See the article on negative pressure breathing for more information. Intermittent positive pressure ventilation, on the other hand, is for inspiration the ‘exact reverse of this process with air being forced into the lungs’ (Baker, 2016: vi).

    Positive pressure ventilation includes the use of bag-valve-masks, but the majority of this article will focus on the ventilator.

    Upcoming articles will discuss the specific settings and how-tos relating to the Pneupac ParaPac ventilator. Current links:

    What is Negative Pressure Breathing?

    The Discovery of Negative and Positive Pressure Ventilation

    What is the relief pressure dial on the ventilator?


    [tabby title=”Inspiration: Expiration”]

    Inspiration: Expiration

    Ventilators have 4 phases of operation:
    1. ‘The inspiratory phase’
    2. ‘Cycling between the inspiratory (I) and expiratory (E) phase’
    3. ‘The expiratory phase’
    4. ‘Cycling between the E and I phase’
    (Baker, 2016: 117)

    The majority of ventilators are set to an I (Inspiratory) to E (Expiratory) ratio of 1:2, i.e. the expiratory phase is twice as long as the inspiratory phase, ‘which mirrors normal breathing’ (Baker, 2016: 108). If required, some ventilators allow this setting to ‘be altered to assist with restrictive lung diseases’ (Baker, 2016: 108). ICU ventilators contain additional settings that alter this ratio, including a ‘respiratory pause’ between the I and E phases ‘to allow distribution of gas within the lungs’ (Baker, 2016: 108).

    [tabby title=”Mechanics”]

    Mechanics

    So, inspiration occurs when air is ‘forced into the lungs’ (Baker, 2016: vi). Expiration, however, occurs when ‘the ventilator stops delivering a positive pressure and the patient breaths out passively, as in normal breathing. This passive expiration (E) is ensured by the elastic recoil of the lungs and the chest wall’ (Baker, 2016: 108). The timing is aided by a ‘pneumatic oscillator’ (Baker, 2016: 22).

    The gas is delivered by the ‘patient circuit’, which also ‘evacuate[s] expired CO2’ (Baker, 2016: 109). This is delivered ‘as close as possible to the airway device being used’ by a valve (Baker, 2016: 109). There are also filters to prevent contamination of the ventilator from the patient.

    Early ventilators had a ‘lack of interactivity with the patient’s own breathing efforts if there was only partial respiratory failure’ (Baker, 2016: 22) but modern ventilators tend to have different modes to account for this and additional settings beyond a simple tidal volume dial. In particular, ventilators feature a ‘demand valve’ which detects when a patient takes a breath (Baker, 2016: 22). There are also settings for tidal volume and ventilation frequency. These settings will be discussed in upcoming articles.

    The Pneupac ParaPac (Smiths Medical)

    Read more: What is the relief pressure dial on the ventilator?

    [tabby title=”The Positives and Negatives”]

    The Positives and Negatives

    The main positive effect of artificial ventilation is fairly obvious: it assists with the ventilation of a patient who is completely or partially unable to breathe normally. There are however a number of negative effects created by positive pressure ventilation. Related to these is the fact that mechanical ventilation can cause ‘heterogeneity’ of the lungs, meaning that ‘some lung units are prone to overdistension and others are prone to collapse’ (Hess & Kacmarek, 2014: 493). These are part of the reason most ventilators have relief pressure settings. This setting will be discussed in an upcoming article. You can check back here for the link.

    Positive pressure ventilation can cause or effect the following:

    The following are unavoidable results of ventilator use:

    Decreased cardiac output
    …Leading to ‘hypotension and potential tissue hypoxia. This effect is greatest with high mean airway pressure, high lung compliance, and low circulating blood volume’ (Hess & Kacmarek, 2014: 513). The high pressure ‘decreases venous return and right heart filling, which may reduce cardiac output’ (Hess & Kacmarek, 2014: 513).

    I.e:
    High pressure –> decreased venous return
    Low pressure –> increased venous return

    This pressure is normally lowest ‘during inhalation’, so venous return would be highest. But with positive pressure ventilation, ‘venous return is greatest during exhalation’ as opposed to inhalation (Hess & Kacmarek, 2014: 513-520).

    Renal and gastric effects
    Mechanical ventilation reduces urine output due to ‘decreased renal perfusion’ which results from ‘decreased cardiac output’ (Hess & Kacmarek, 2014: 527). Unfortunately this can cause many of the issues common with fluid retention. Similarly, gastric distension can result, along with gastrointestinal bleeding’ (Hess & Kacmarek, 2014: 533).

    Increased intracranial pressure
    …in head injury patients, due to ‘a decrease in venous return, which increases intracranial blood volume and pressure’ (Hess & Kacmarek, 2014: 540).

    Pneumonia may occur, especially due to invasive ventilation which is the form in emergency practice (non-invasive refers to ventilatory support such as CPAP). It ‘results from aspiration of oropharnygeal secretions around the cuff of the endotracheal tube’ (Hess & Kacmarek, 2014: 499).

    The following can occur as a result of ventilator settings:

    Hyperventilation and hypoventilation
    These risk effecting the pH, and causing respiratory alkalosis (Hess & Kacmarek, 2014: 499)

    Oxygen Toxicity due to high oxygen levels (Hess, 2014: 506)

    A Shunt is usually partly decreased but settings can change this:
    A shunt is ‘perfusion (blood flow) without ventilation’, which happens ‘when blood flows from the right heart to the left heart without participating in gas exchange’ (Hess & Kacmarek, 2014: 427). There are two different types of shunts: capillary and anatomic. The first occurs when the alveoli are not ventilated. One example of this is pneumonia (Hess & Kacmarek, 2014: 427). The latter type of shunt occurs when blood flow ‘completely bypasses the lungs’, which can sometimes happen with ‘congenital cardiac defects’ (Hess & Kacmarek, 2014: 427).

    Positive Pressure Ventilation’s typical effect is to decrease capillary shunt by improving ‘the distribution of ventilation, particularly by improving the ventilation of previously underventilated areas of the lungs’ (Hess & Kacmarek, 2014: 427-446)

    Despite the above improvements, if the settings are not ideal hypoxemia can result. This is the same outcome as a shunt but would in this case be caused by ‘redistribution of pulmonary blood flow to unventilated regions’ due to ‘overdistension of some lung units’ (Hess & Kacmarek, 2014: 324). Positive pressure ventilation can also increase anatomic shunt (Hess & Kacmarek, 2014: 441)

    Also due to incorrect settings, the following can occur as a lack of pressure or volume:

    Atelectasis occurs when the pressure or volume during or after artificial ventilation isn’t enough to inflate the lungs –> complete or partial collapse.

    Atelectasis ‘is larger with obese patients and when a higher fraction of inspired oxygen (FI02) is used […]. During mechanical ventilation […] atelectasis may occur when lungs are underinflated due to low tidal volumes, or when compression occurs (such as patient position or obesity)’ (Open Anesthesia, 2017). If the volume or pressure isn’t enough to ‘prevent the alveoli from collapsing’ (Open Anesthesia, 2017) then regardless of ventilator type (pressure vs volume controlled) atelectasis may result.

    The following can occur as a result of apparatus setup:

    Dead Space can be increased by mechanical ventilation (Hess & Kacmarek, 2014: 471). It may be ‘reduced by an artificial airway (ETT) but is increased by increasing distance from the end of the ETT to the means of evacuating CO2 in mechanical ventilation’ (Baker, 2016: 111). Size, age, upright postures and neck extension also increase it (Baker, 2016: 111).

    The following can occur due to overdistension:

    Barotrauma = ‘alveolar rupture due to overdistension’, which can cause numerous problems including pneumothorax (Hess, 2014: 480). Volume generators have a ‘safety valve which activates at a preset pressure’ to avoid barotrauma’ (Baker, 2016: 118). This will be discussed in an upcoming article.

    Ventilator-Induced lung injury caused by overdistension. Massively effected by ventilator settings for tidal volume and relief pressure (Hess, 2014: 493)

    There are additional risks of positive pressure ventilation, particularly mechanical ventilation. Some of these are related to the use of airway adjuncts. Others are related to the removal of the ventilator. To read more, check out the references below.

    [tabby title=”Types of Positive Pressure Ventilation”]

    Types of Positive Pressure Ventilation

    ‘A spectrum of modes exist between total artificial ventilation and a patient who is still breathing spontaneously but with reduced efforts’ (Baker, 2016: 105).

    There are two main types of ventilators:
    – Pressure generated
    – Volume generated

    Pressure generators ‘provide a constant pressure during the inspiratory phase’ (Baker, 2016: 118). Volume generators release gas once a set volume has been reached. In each one, only the pressure or the volume is a constant. Everything else is relative and will adjust until the preset parameter of volume or pressure has been reached (Baker, 2016; Hess, 2014).

    Issues
    ‘The problem of pressure generation is that it cannot guarantee an adequate Vt [volume] in situations where the lung mechanics are abnormal or where a guaranteed Vt is required due to life-threatening hypoxia. They are therefore not suitable for most emergency ventilation, with the notable exception of neonatal and infant ventilation where flow generators are contraindicated due to the fragility of the lung tissue’ (Baker, 2016: 118).

    Additional Types
    Most ventilators switch from inspiration to expiration by ‘time cycling’ (Baker, 2016: 119). However, this can also be due to volume or pressure cycling. The time cycling ratio is usually 1:2 for I:E, in other words the expiration time is twice as long as the inhalation time. ‘Ventilation modes can best be understood as a spectrum describing the work of breathing done by the ventilator and by the patient’ (Baker, 2016: 122.

    The modes are: Controlled Mandatory Ventilation, in which ‘ventilation is provided entirely by the ventilator’ (Baker, 2016: 122), Assisted Controlled Ventilation which is fairly self-explanatory, and Synchronised Mandatory Ventilation, in which ‘the patient’s respiratory efforts in initiating a ventilation are synchronised with ventilations provided automatically by the ventilator.’ This is best used to supplement the patient’s efforts. It’s otherwise known as ‘assist-control’ and is typically found in ICU. (Baker, 2016: 123).

    In portable ventilators the modes are:
    Intermittent Mandatory Ventilation, Synchronised intermittent mandatory ventilation, and synchronised mandatory minute volume but only the latter two are still in use. The second overcomes the problems of the first, ensuring that breaths are supplemented by the ventilator and that supplemented breaths are activated only when there is a certain trigger e.g. low pressure. There is a modern, more complex version of this now in use in hospitals but this may exist in emergency ventilation practice to assist a patient who is ‘in partial respiratory failure’ (Baker, 2016: 124).

    The first two divide minute volume between the ventilator and the second. The latter is based on time, which is compared with a ‘set minute volume. If there is a discrepancy between the actual minute volume and the set delivered minute volume, an automatic ventilation is delivered which corrects the difference’ (Baker, 2016: 124).

    Because there is an issue of the ventilator being unable to tell the difference between dead space ventilation and alveolar ventilation, Pneupac have modified the above with a series of Ifs (if the patient takes a breath, if there is no further breath, if the tidal volume is too low, etc) that adjusts settings accordingly (Baker, 2016: 124). There are more modes that exist for ICU ventilators, which tend to be a lot more complex in design (Baker, 2016).

    Read about the solution: What is the relief pressure dial on the ventilator?

    [tabby title=”CPAP and BIPAP”]

    CPAP

    CPAP is also a form of positive pressure breathing and is designed ‘to improve oxygenation in lungs that may not be exchanging oxygen with the blood adequately’ (Baker, 2016: 126). There is a constant pressure in CPAP, versus ‘different pressures during inspiration and expiration’ in BIPAP’ but both are designed to allow the patient to do all the work of breathing. They merely increase oxygen and make inspiration easier while increasing the work of expiration. ‘Breathing with CPAP has been compared to the sensation of breathing against a very strong wind’ (Baker, 2016: 128). They ‘open up (recruit) alveoli in the lungs that may be non-ventilated.’ (Baker, 2016: 127). Both push back fluid ‘into the circulation via lymphatic drainage of the lung interstitial space’ and increase ‘the diffusion of oxygen into the pulmonary capillaries’ (Baker, 2016: 127).

    [tabby title=”PEEP”]

    PEEP

    Positive End Expiratory Ventilation applies ‘a positive pressure to the patient during the expiratory phase’ to ‘increase the functional residual capacity of the lungs and thus the efficiency of oxygenation of the blood’ (Baker, 2016: 126). ‘In order to be able to deliver a set tidal volume against variable lung compliance and airway resistance, resuscitation ventilators should be time-cycled, volume preset flow generators’ (Baker, 2016: 132).


    References

    Baker, D.J. 2016. Artificial Ventilation: A Basic Clinical Guide (ebook), Springer International: Switzerland

    Hess, D. & Kacmarek, R.M. 2014. Essential of Mechanical Ventilation (ebook), McGraw-Hill Education: New York

    Open Anesthesia, 2017. Ventilator Settings: atelecasis, Available Online: https://www.openanesthesia.org/ventilator_settings_atelectasis/ (Accessed 09/11/17)

    [tabbyending]


    This post is yet to be peer reviewed. Please get in touch if you have any comments.
  • The Discovery of Negative and Positive Pressure Ventilation – Fast Fact

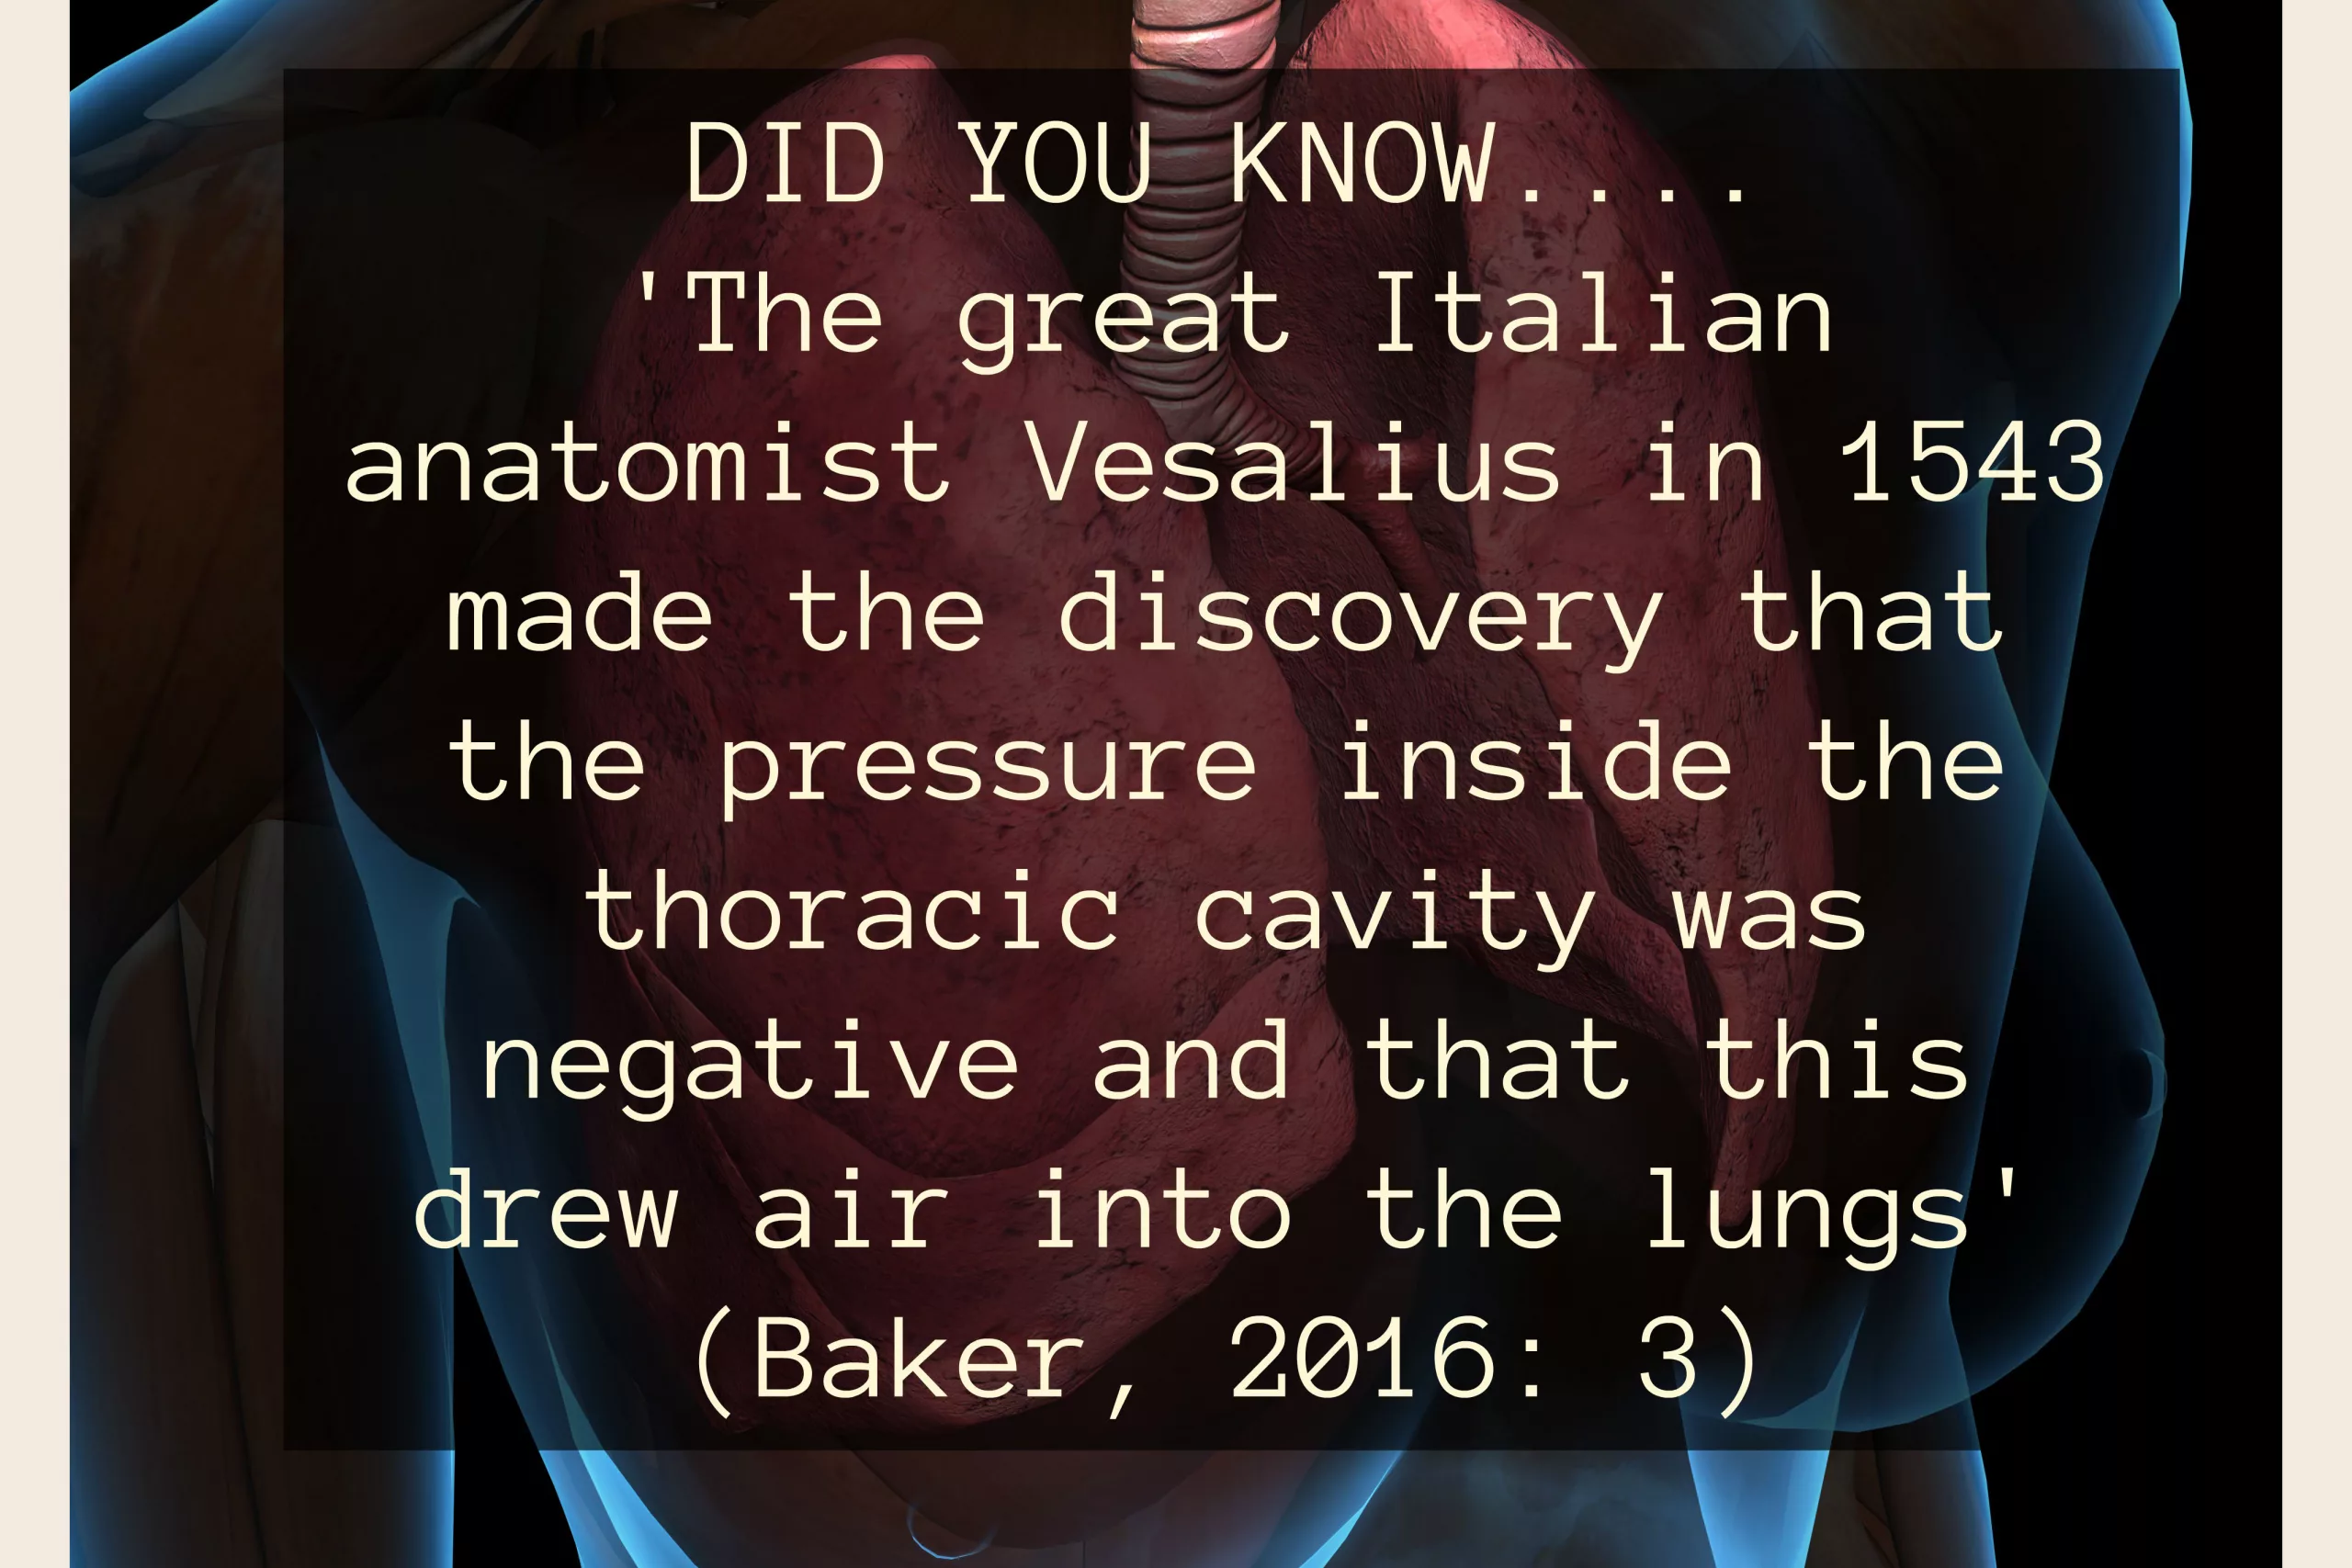
    The Discovery of Negative and Positive Pressure Ventilation – Fast Fact


    ‘He opened the chest of a live animal and noted that air rushed in and the lungs collapsed, following which the heart stopped’ (Baker, 2016: 3).

    His experiment was actually repeated in 1667 by one Robert Hooke. He used positive pressure ventilation to keep a dog, whose chest had been opened, alive. This was ‘the first demonstration that it was the gas entering and leaving the lungs which supported life and not the movement of the lungs themselves’ (Baker, 2016: 3-4).

    This was one of many discoveries that birthed the idea of positive pressure ventilation, the understanding of negative pressure ventilation and the various forms of artificial ventilation that followed.


    Reference

    Baker, D. J. 2016. Artificial Ventilation: A Basic Clinical Guide, Springer International: Switzerland.

  • What is Negative Pressure Breathing?

    What is Negative Pressure Breathing?

    Negative pressure breathing is how we breathe normally, without the aid of bag-valve-masks or mechanical ventilators.

    Inspiration – Normally

    Breathing in is produced by ‘contraction and downward motion of the diaphragm [which] causes a negative pressure in the chest’ —–> inspiration. (Goldberg, 2014: 51, emphasis added)

    Inspiration is therefore a muscular process (the diaphragm is a muscle) which is normally mainly reliant on the diaphragm. However, accessory muscles including the ‘pectoralis major and minor’ may also be used and are ‘vital to survive in certain pulmonary conditions’ (Goldberg, 2014: 51).

    Let’s explain this by breaking it down:

    Why does a contracting diaphragm cause negative chest pressure?

    Because the volume has increased. This process is represented in Boyle’s Law (Rice University, 2016). Put simply, more space = more volume. When there’s more space in the chest, as with the contracting diaphragm, there is more room for air particles to move. They’re not crammed in any more, so there’s not much pressure.

    On the other hand, when those air particles are tightly squeezed in a smaller space, there is less pressure.

    To summarise:

    • more space = more volume
    • less space = less volume
    • more volume = less pressure
    • less volume = more pressure
    • Tightly squeezed particles in little volume cause a lot of pressure
    • Free moving particles in a lot of volume cause less pressure

    Why does negative pressure cause inspiration?

    This has to do with the laws of thermodynamics. ‘For anything to happen, energy has to move or flow or change’ and ‘energy has an absolute unfailing tendency to go from “more concentrated” to “less concentrated”‘ (Watson, 2014).

    So, it’s not so much because there is a negative pressure that we inhale. It’s because there is a change in pressure. When the diaphragm contracts, the pressure changes from high to low. Now there is no equilibrium. One of the laws of the universe (which is called a law because it’s been observed over and over again in different ways) occurs as a result: energy attempts to shift toward equilibrium. And the way it does that is by moving from an area of high pressure (outside the body) to one of low pressure (inside us).

    Watson, 2014 has written a great explanation of this here: http://www.ftexploring.com/energy/2nd_Law.html>

    Also, this is a great video which demonstrates the process: https://www.youtube.com/watch?v=q6-oyxnkZC0

    Expiration – Normally

    pexels-photo-321576

    This is ‘largely passive’, frequently happening ‘without any muscle action’ when relaxed. The contracted diaphragm simply ‘springs back into shape’ (Goldberg, 2014: 51). However, using the ‘external and internal intercostal muscles’ amongst others, you can ‘voluntarily exhale forcefully’ (Goldberg, 2014: 51).

    Either way, this process creates more pressure because there is now less volume (less space) for air particles to move around. Following the laws described above, air moves from an area of high pressure (the lungs) to an area of low pressure (outside) (Collison et al, 2002: 57; Watson, 2014).

    It’s intuitive that this change in pressure and lack of equilibrium (Watson, 2014) will ensure that the process repeats itself. Each time the diaphragm contracts, the volume changes so the pressure changes. Air flows inside. Then there’s too much pressure and less volume as the diaphragm is returning to shape (Goldberg, 2014). So air flows out. Then the diaphragm contracts again…

    References

    Baker, D. n.d. Emergency and Transport Ventilation: an introductory guide, Smiths Medical International Limited: Bedfordshire

    Collison, P. et al, 2002. Nelson Modular Science: 2, Nelson Thornes Ltd: Cheltenham.

    Goldberg, S. 2014. Clinical Physiology made ridiculously simple, MedMaster: Miami.

    Rice University, 2016. The Process of Breathing, Available Online: https://opentextbc.ca/anatomyandphysiology/chapter/22-3-the-process-of-breathing/ (Accessed 01/11/2017)

    Watson, D. 2010. The Second Law of Thermodynamics, Available Online: http://www.ftexploring.com/energy/2nd_Law.html (Accessed 01/11/2017)


    This article has not been endorsed by any company.

    With thanks to Smiths Medical for providing information.


    review time Business Concept , time for review , Business team hands at work with financial reports and a laptop
    This post is yet to be peer reviewed. Please get in touch if you have any comments.
  • How to size and insert an OP airway adjunct (insertion only)

    How to size and insert an OP airway adjunct (insertion only)

    This video demonstrates how to insert an OP airway adjunct to an adult patient. A full video, showing how to size & insert the adjunct, along with information about relevant anatomy, is available on our YouTube channel. For more videos like this, stay tuned to www.article999.co.uk as well as the YouTube, Facebook and Twitter pages.

    This is the shorter version of the OPA video. For the long version, featuring the when, where and how of OP airway adjuncts, please click here.

    Menu

    0:08 disclaimer

    0:25 Seen this video before? Skip to the main content

    0:33 Sizing the OPA

    0:38 Inserting the OPA

    1:01 References


    Disclaimer

    All of the content published by Article 999 follows reputable guidelines and are referenced. This video has not been endorsed by any organisation, author or ambulance trust. You must read the full disclaimer available at www.article999.co.uk/about/ (disclaimer tab) before putting into place anything you read or watch here. Please also remember to check your local guidelines before practicing any of these skills.


    Transcript

    Remember hand hygiene, bare below the elbows, and gloves in real life! (AACE, 2016)

    Having opened the airway using manual airway manouvres and checking it is clear of obstruction, and having already selected the appropriate airway adjunct and size, now insert the adjunct back to front (Pilbery & Lethbridge, 2016) with the bendy part, named ‘the body’ (Beattie, 2005), curved towards the patient’s upper lip and nose. Once the adjunct has reached the soft palate, rotate it 180 degrees and advance it (Pilbery & Lethbridge, 2016). It should now rest in the pharynx (Pilbery & Lethbridge, 2016).

    Made by www.article999.co.uk

    Full disclaimer available at website.


    References

    Beattie, S. 2005. Placing an oropharnygeal airway, Available Online: http://www.modernmedicine.com/modern-… (Accessed 18/05/17)

    Pilbery, R. and Lethbridge, K. 2016. Ambulance Care Practice, Bridgwater: Class Professional Publishing


    Music:

    Dobroide, 2010. 20091229.ambulance.siren.wav. Available Online: https://freesound.org/people/dobroide… (Accessed 21/08/17)

    Productiontrax.com


    Images:

    Article 999’s own or licenses purchased via Adobe Stock & Dreamstime


    Final note.

    Why is it so important to size the adjunct? Because ‘If the airway [device] is too long it may occlude the airway by […] displacing the epiglottis; if too short it will not separate the soft palate or tongue from the posterior wall of the pharnyx’

    Gregory, P. & Mursell, I. 2010. ‘Airway management’ in Manual of Clinical Paramedic Procedures, Sussex: Blackwell Publishing, pp. 2-34


    This post has been peer reviewed by at least one other individual. Let us know what you think in the comments below.
  • How to size and insert and OP airway adjunct: Where, When and How?

    How to size and insert and OP airway adjunct: Where, When and How?


    This video demonstrates how to size and insert an OP airway adjunct and points out relevant airway anatomy. A summary, showing OP airway insertion only, is available on our YouTube channel. For more videos like this, stay tuned to www.article999.co.uk as well as the YouTube, Facebook and Twitter pages.

    Menu

    0:07 disclaimer

    0:24 anatomy

    1:04 When?

    1:14 How? Sizing

    1:54 Insertion

    2:26 References


    Disclaimer

    All of the content published by Article 999 follows reputable guidelines and are referenced. This video has not been endorsed by any organisation, author or ambulance trust. You must read the full disclaimer available at www.article999.co.uk/about/ (disclaimer tab) before putting into place anything you read or watch here. Please also remember to check your local guidelines before practicing any of these skills.


    Transcript

    Remember hand hygiene, bare below the elbows, and gloves in real life! (AACE, 2016)

    Airway adjuncts ‘prevent the tongue from partially or completely obstructing the airway’ (Anaesthesia UK, 2010).

    The key parts of the upper airway for this video concern the nasal cavity, the oral cavity, the hard palate, the soft palate (at the back of the mouth), the oropharnyx and the pharynx, which is a ‘muscular membranous channel’ (QA International, 2017) that ‘begins at the base of the skull’ and ‘connects the nasal cavities to the […] oesophagus’ (Pazhaniappan, 2017). It is made up of the nasopharynx, oropharynx, and laryngopharynx (Pazhaniappan, 2017). It is also the location a correctly sized OP airway should sit in.

    Use an OP airway on ‘an unresponsive patient’ who does not have a gag reflex (Pilbery & Lethbridge, 2016).

    Having opened the airway using manual airway manouvres and checking it is clear of obstruction, now size the adjunct (Pilbery & Lethbridge, 2016). OP airways range from size 000 to 5 (AACE, 2016). To find the right size, measure ‘the vertical distance between the patient’s incisors and the angle of the jaw’ (Pilbery & Lethbridge, 2016), as shown. The flange (Beattie, 2005) should align with the lips and ‘the tip to the angle of the jaw’ (Anaesthesia UK, 2017). When correctly fitted, the OP airway should be just big enough to have the flange (Beattie, 2005) resting over the patient’s lips. Now insert the adjunct back to front (Pilbery & Lethbridge, 2016) with the bendy part, named ‘the body’ (Beattie, 2005), curved towards the patient’s upper lip and nose. Once the adjunct has reached the soft palate, rotate it 180 degrees and advance it (Pilbery & Lethbridge, 2016). It should now rest in the pharynx (Pilbery & Lethbridge, 2016).

    Made by www.article999.co.uk

    Full disclaimer available at website.


    References

    Anaesthesia UK, 2010. Guedal Airway, Available Online: http://www.frca.co.uk/article.aspx?ar… (Accessed 22/08/2017)

    Association of Ambulance Chief Executives (AACE). 2016. UK Ambulance Services Clinical Practice Guidelines 2016, Bridgwater: Class Professional Publishing

    Beattie, S. 2005. Placing an oropharnygeal airway, Available Online: http://www.modernmedicine.com/modern-… (Accessed 18/05/17)

    Pazhaniappan, N. 2017. The Pharynx, Available Online: http://teachmeanatomy.info/neck/visce… (Accessed 22/08/17)

    Pilbery, R. and Lethbridge, K. 2016. Ambulance Care Practice, Bridgwater: Class Professional Publishing QA International, 2017. Respiratory System, Available Online: http://visual.merriam-webster.com/hum… (Accessed 22/08/17)

    Music:

    Dobroide, 2010. 20091229.ambulance.siren.wav. Available Online: https://freesound.org/people/dobroide… (Accessed 21/08/17)

    Productiontrax.com

    Images:

    Article 999’s own or licenses purchased via Adobe Stock & Dreamstime


    Final note.

    Why is it so important to size the adjunct? Because ‘If the airway [device] is too long it may occlude the airway by […] displacing the epiglottis; if too short it will not separate the soft palate or tongue from the posterior wall of the pharnyx’

    Gregory, P. & Mursell, I. 2010. ‘Airway management’ in Manual of Clinical Paramedic Procedures, Sussex: Blackwell Publishing, pp. 2-34


    This video has been peer reviewed by one or more people. Let us know what you think by commenting below.
  • I-Gel: When, How?

    I-Gel: When, How?

    This video shows only the when and how of I-Gels. To view a longer video, which contains the why, what, when and how, click here.

    This version has been created to enable those of you who want to refresh yourself on only the need to knows – the use of the i-gel – to do so quickly and easily.

    This video has not been endorsed by any organisation, author or ambulance trust. You must refer to local guidelines and read Article 999’s full disclaimer, available at www.article999.co.uk/about/ (disclaimer tab), before putting into place anything you see or read here.


    This video has been peer reviewed by 2 or more individuals. No drastic changes have been suggested, so improvements will be made to future posts.