Reference: National Institute for Health and Care Excellence. (2014). Head injury: assessment and early management (NICE Clinical Guideline 176). Retrieved from https://www.nice.org.uk/guidance/cg176
This has not yet been peer reviewed. Comment and review below 🙂
A shorter version of Ventilators: Why, What, How, When? featuring how-to use the ventilator demonstrations only. Made by UK Paramedics, this demonstrates how to use the PneuPac ParaPac ventilator.
You must read the full disclaimer at www.article999.co.uk/about/ (disclaimer tab) before putting into place anything you see here. Useful information is available in the text on this video, so if you only listen to the narration you will miss important facts. The ventilation settings mentioned in this video are what is recommended by Smiths Medical, current guidelines and some articles – however, as with all topics, there is always varying information available online & alternative expert advice, and no video can cater for all of that. Similarly, this video is intended to demonstrate how to use equipment & to introduce or remind you to the Why, What and When of ventilators – not to tell you that you should or shouldn’t be using it. That is dependent on local guidelines, your research & your choice as a clinician. This video merely highlights the varying advice regarding tidal volume settings, and in the text points out the potential problems with some of the figures. No specific volume is recommended.
Transcript
Article 999. Ventilators: Why, What, How, When?
This video has been made by UK Paramedics following guidelines. It is not endorsed by any author, organisation or Ambulance Trust. You must read the full disclaimer at www.article999.co.uk/about/ and refer to your local guidelines before putting into place anything you see here. This video is intended to demonstrate how to use the ventilator according to use guides and guidelines – not to tell you that you should or shouldn’t use it. That decision is up to you and should be dependent on local guidelines and your own research. This is what the textbooks, the manufacturer and a few articles say & is not intended to represent the expert opinions or experience of others within healthcare.
Remember hand hygiene, bare below the elbows and gloves in real life.
How?
To remove the ventilator from the racks, pull the flap to the side and push the ventilator up. To put it back in, simply push it down and pull the flap to the side again.
To connect to the gas supply, push the hose into the socket and twist. It’s the same when connecting to a portable oxygen cylinder.
When you turn it on, the ventilator should complete a self check. The alarm lights should flash in sequence, there should be one burst of the high pressure audible alarm, and the orange indicator should flash for 60 seconds.
Next, check the indicator shows white for O2.
Connect the patient circuit [shown in video].
Next on the list, adjust the ventilation parameters. Set the air mix control to no air mix for respiratory arrest or CPR. Set the relief pressure control to 40. Set the respiratory rate to 12. As for the tidal volume, it varies massively as you can see on the screen. It depends on whether you opt for an average value or base it on the patient’s weight. Smiths Medical (2017) advise 800-900ml on their training video, [but this may not be advisable] but don’t worry too much about the slight differences in tidal volume because the PneuPac features a high pressure alarm that we’ll discuss shortly. The alarm will help you identify if the tidal volume is too high for your patient.
The middle one tells you when breathing is detected by the ventilator
(Smiths Medical, 2017)
High pressure = excessive tidal volume, incorrect airway position, kinked ET tube, or incorrect ventilation settings.
If the pressure is reaching it’s max, there may be something wrong with the circuit.
If you’ve checked the above and the alarm is still sounding, Smiths Medical (2017) advise that your tidal volume setting might simply be too high.
Low pressure = leakage or insufficient tidal volume/settings, faulty valve in the patient’s circuit
This alarm tends to occur when pressure drops below 10cmh20
Earlier, I pointed out the alarm in the middle, at the bottom. This is SMMV. It’s an indicator that will flash green if the patient is breathing for themselves. The ventilator will assist if the patient breathes with less than 150ml of tidal volume. Between 150-400ml the ventilator will extent the exhalation time to allow the patient to complete their own breath, and above 400ml the ventilator will allow the patient to breathe and will not assist, but may still assist on the next breath if required (Smiths Medical, 2017; Baker, 2012).
Extra facts:
McCarty et al (2012) found that ‘ventilation rates and tidal volumes commonly exceeded Guideline recommendations. This resulted in […] excessive mean airway pressure’
Smiths Medical (2017) advise that peak inflation pressure should be below 20cmh20 when using a mask to ventilate due to the issues of too high pressure
Inspiration to Expiration should be 1:2 (Smiths Medical, 2017; Baker, 2012)
References
Baker, D. 2012. Emergency and Transport Ventilation, an introductory guide, Smiths Medical International Limited: Luton
You must read the full disclaimer at www.article999.co.uk/about/ (disclaimer tab) before putting into place anything you see here. Useful information is available in the text on this video, so if you only listen to the narration you will miss important facts. The ventilation settings mentioned in this video are what is recommended by Smiths Medical, current guidelines and some articles – however, as with all topics, there is always varying information available online & alternative expert advice, and no video can cater for all of that. Similarly, this video is intended to demonstrate how to use equipment & to introduce or remind you to the Why, What and When of ventilators – not to tell you that you should or shouldn’t be using it. That is dependent on local guidelines, your research & your choice as a clinician. This video merely highlights the varying advice regarding tidal volume settings, and in the text points out the potential problems with some of the figures. No specific volume is recommended.
Transcript
Article 999. Ventilators: Why, What, How, When?
This video has been made by UK Paramedics following guidelines. It is not endorsed by any author, organisation or Ambulance Trust. You must read the full disclaimer at www.article999.co.uk/about/ and refer to your local guidelines before putting into place anything you see here. This video is intended to demonstrate how to use the ventilator according to use guides and guidelines – not to tell you that you should or shouldn’t use it. That decision is up to you and should be dependent on local guidelines and your own research. This is what the textbooks, the manufacturer and a few articles say & is not intended to represent the expert opinions or experience of others within healthcare.
Remember hand hygiene, bare below the elbows and gloves in real life.
Why use the ventilator?
Research suggests that mechanical ventilators can reduce the variability of breath timings & as a result, capnography readings. They can also increase the likelihood of ‘effective ventilation’ (Owen and Castle, 2006)
To quote from Gregory & Mursell (2010: 47) ‘A high flow rate over a short inflation time inevitably produces a high peak airway pressure in an unprotected airway [as with BVM technique]. High peak airway pressure overcomes the pressure of the lower oesophageal sphincter and causes gastric inflation. […] Use of […] mechanical ventilation may help to overcome the high pressures involved. […] In an intubated patient or a patient with an LMA in situ, use of a mechanical ventilator has been shown to allow paramedics to accomplish extra tasks, document better, and provide better patient care’ (Gregory & Mursell, 2010: 47)
What?
This is a time-cycled, volume preset flow generator (Baker, 2012). In other words, the pressure can vary, volume is always the same, and the air must be delivered within a preset time, which helps to control the tidal volume.
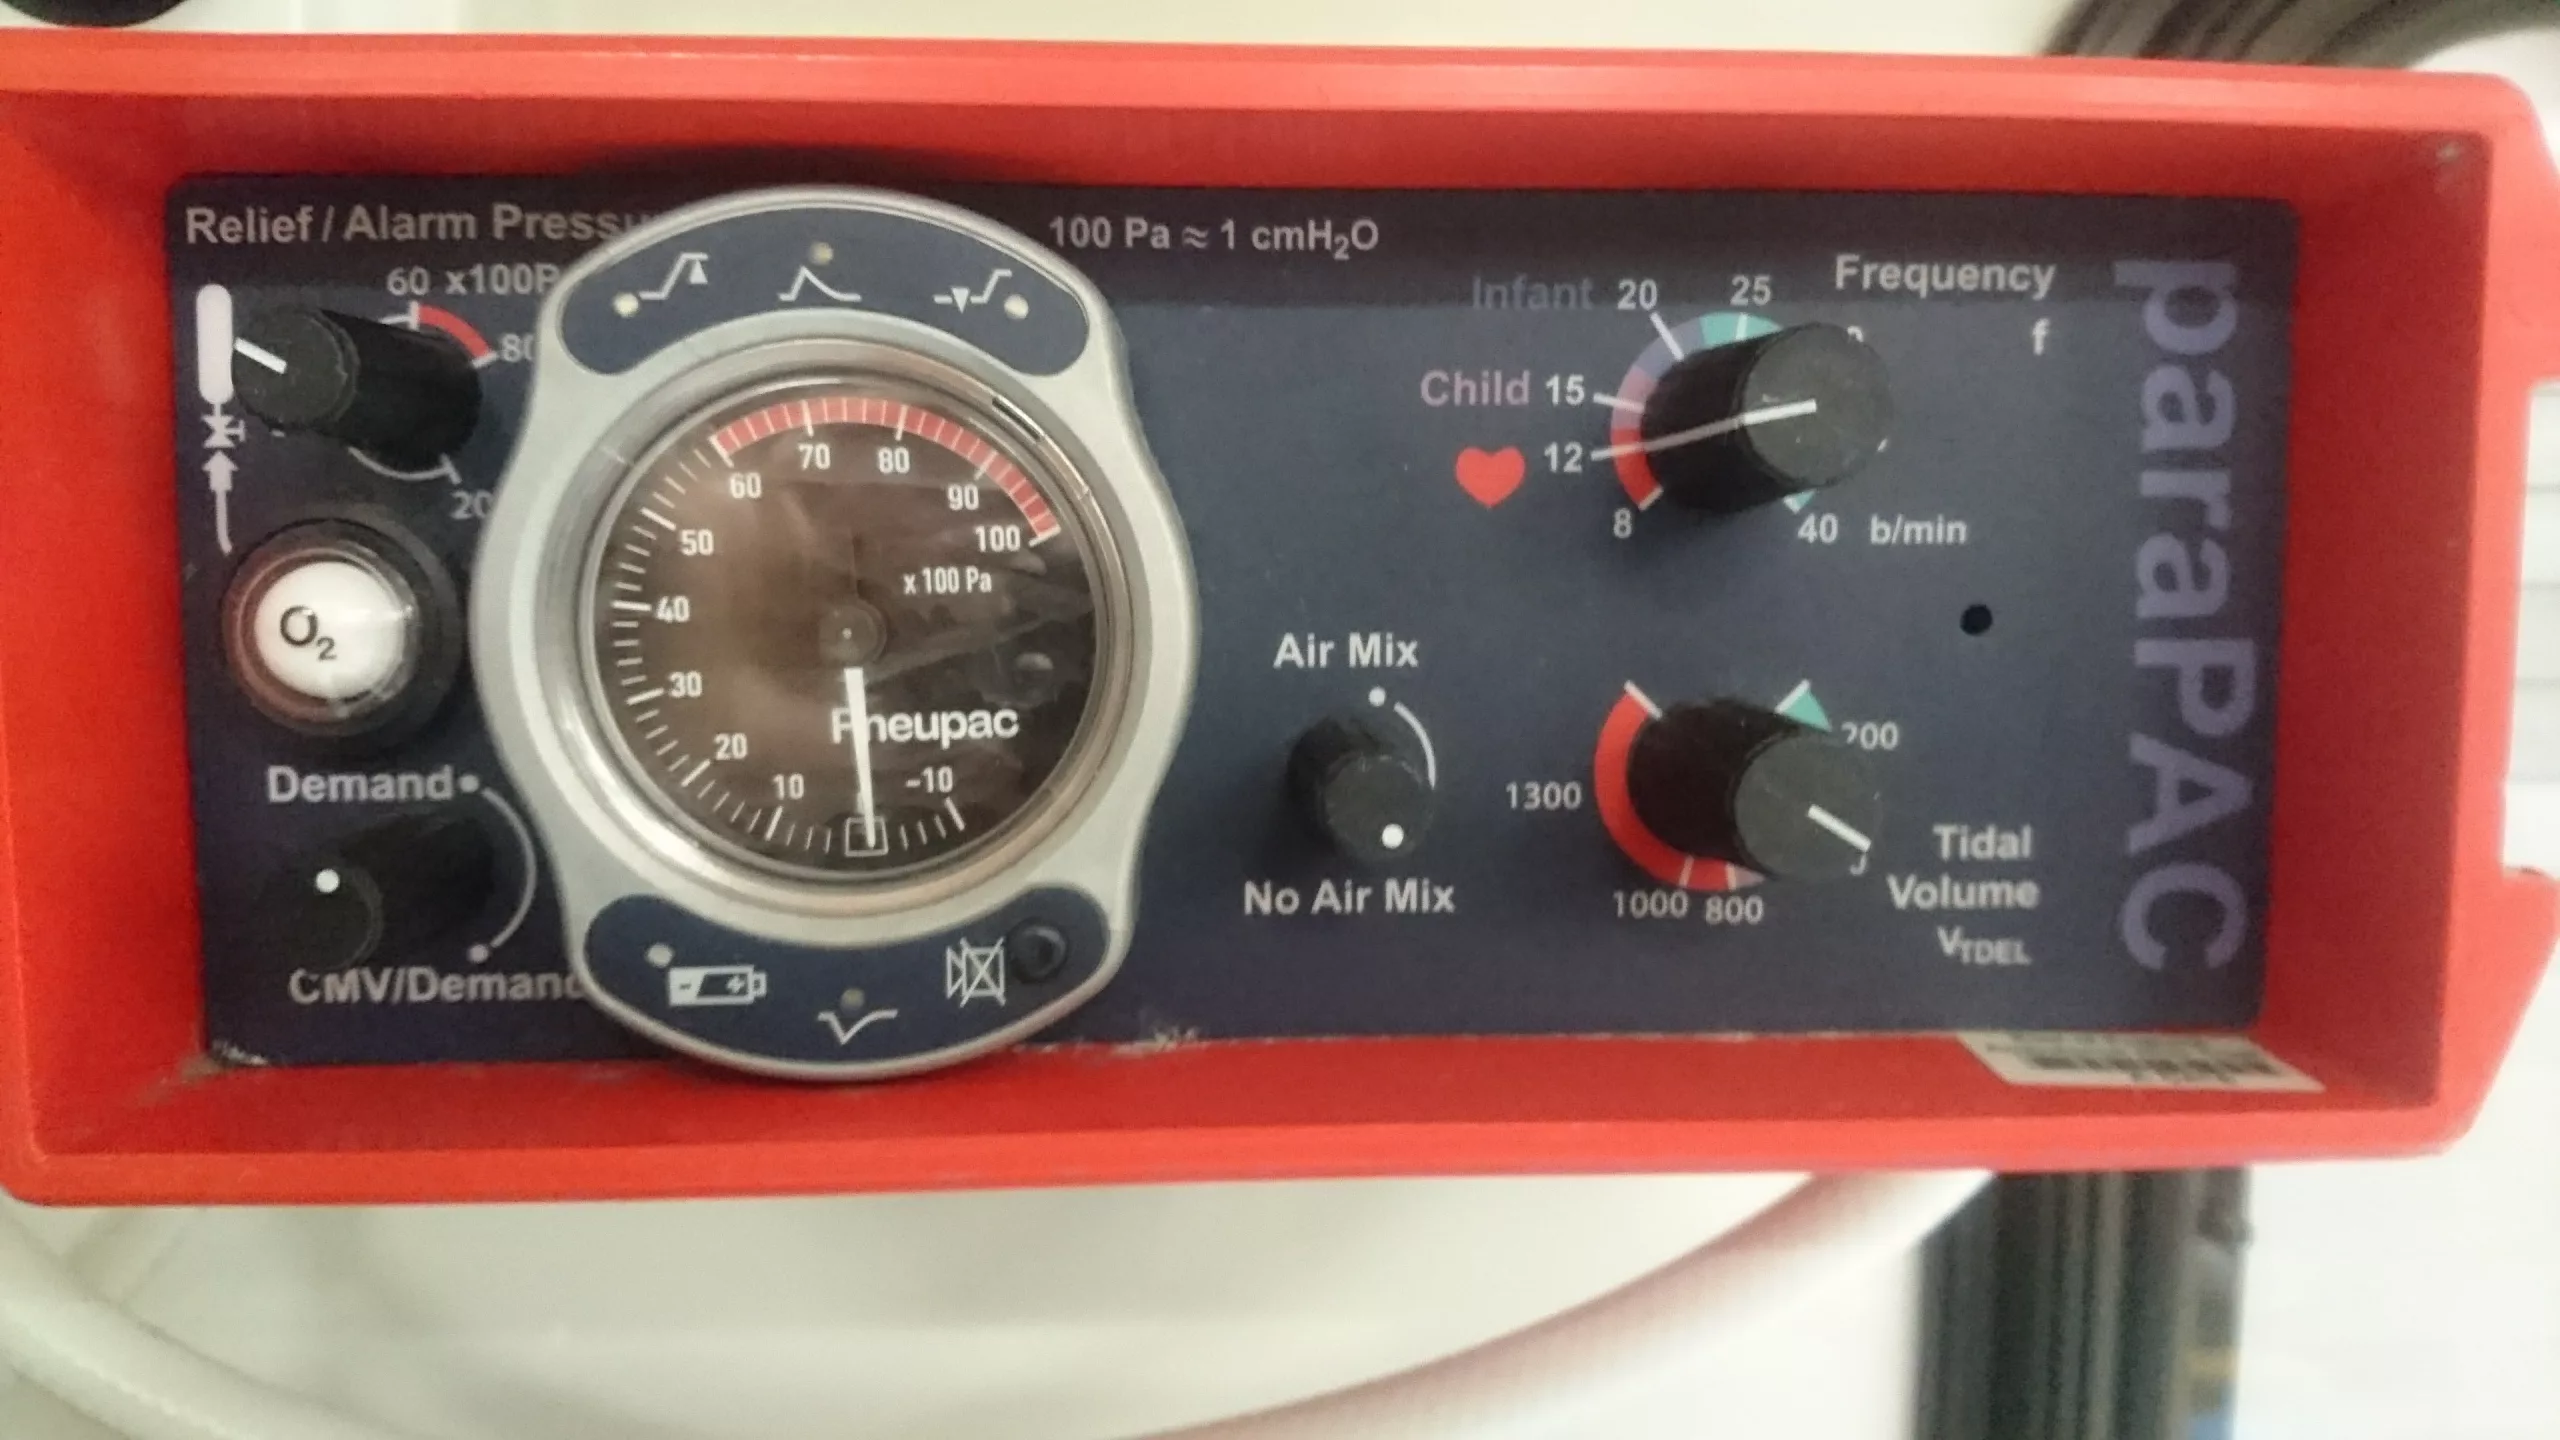
There are many different types. One of the most common ones in UK ambulances at this time (Gregory & Mursell, 2010: 44) is the Pneupac paraPAC (Smiths Medical, 2017) but the ParaPac Plus may soon replace it.
Here are the useful parts:
The supply gas failure alarm
The inlet connection
The relief pressure control
The ‘main pneumatic switch’
Air mix control
Inflation pressure monitor
Frequency control
Tidal volume control
(Pilbery and Lethbridge, 2016: 189)
How?
To remove the ventilator from the racks, pull the flap to the side and push the ventilator up. To put it back in, simply push it down and pull the flap to the side again.
To connect to the gas supply, push the hose into the socket and twist. It’s the same when connecting to a portable oxygen cylinder.
When you turn it on, the ventilator should complete a self check. The alarm lights should flash in sequence, there should be one burst of the high pressure audible alarm, and the orange indicator should flash for 60 seconds.
Next, check the indicator shows white for O2.
Connect the patient circuit [shown in video].
Next on the list, adjust the ventilation parameters. Set the air mix control to no air mix for respiratory arrest or CPR. Set the relief pressure control to 40. Set the respiratory rate to 12. As for the tidal volume, it varies massively as you can see on the screen. It depends on whether you opt for an average value or base it on the patient’s weight. Smiths Medical (2017) advise 800-900ml on their training video, [but this may not be advisable] but don’t worry too much about the slight differences in tidal volume because the PneuPac features a high pressure alarm that we’ll discuss shortly. The alarm will help you identify if the tidal volume is too high for your patient.
The middle one tells you when breathing is detected by the ventilator
(Smiths Medical, 2017)
High pressure = excessive tidal volume, incorrect airway position, kinked ET tube, or incorrect ventilation settings.
If the pressure is reaching it’s max, there may be something wrong with the circuit.
If you’ve checked the above and the alarm is still sounding, Smiths Medical (2017) advise that your tidal volume setting might simply be too high.
Low pressure = leakage or insufficient tidal volume/settings, faulty valve in the patient’s circuit
This alarm tends to occur when pressure drops below 10cmh20
Earlier, I pointed out the alarm in the middle, at the bottom. This is SMMV. It’s an indicator that will flash green if the patient is breathing for themselves. The ventilator will assist if the patient breathes with less than 150ml of tidal volume. Between 150-400ml the ventilator will extent the exhalation time to allow the patient to complete their own breath, and above 400ml the ventilator will allow the patient to breathe and will not assist, but may still assist on the next breath if required (Smiths Medical, 2017; Baker, 2012).
When?
– AACE (2016) recommend considering ventilation if a ptn’s o2 sats <90 on high con o2,
if the RR is <10 or >30 bpm or if there is ‘inadequate chest expansion’ (p42) but the mechanical ventilator is to be used …
– for ’emergency and transport ventilation’ in 5kg + patients (Smiths Medical, 2017)
Extra facts:
McCarty et al (2012) found that ‘ventilation rates and tidal volumes commonly exceeded Guideline recommendations. This resulted in […] excessive mean airway pressure’
Smiths Medical (2017) advise that peak inflation pressure should be below 20cmh20 when using a mask to ventilate due to the issues of too high pressure
Inspiration to Expiration should be 1:2 (Smiths Medical, 2017; Baker, 2012)
References
Baker, D. 2012. Emergency and Transport Ventilation, an introductory guide, Smiths Medical International Limited: Luton
This video demonstrates how to insert an OP airway adjunct to an adult patient. A full video, showing how to size & insert the adjunct, along with information about relevant anatomy, is available on our YouTube channel. For more videos like this, stay tuned to www.article999.co.uk as well as the YouTube, Facebook and Twitter pages.
This is the shorter version of the OPA video. For the long version, featuring the when, where and how of OP airway adjuncts, please click here.
All of the content published by Article 999 follows reputable guidelines and are referenced. This video has not been endorsed by any organisation, author or ambulance trust. You must read the full disclaimer available at www.article999.co.uk/about/ (disclaimer tab) before putting into place anything you read or watch here. Please also remember to check your local guidelines before practicing any of these skills.
Transcript
Remember hand hygiene, bare below the elbows, and gloves in real life! (AACE, 2016)
Having opened the airway using manual airway manouvres and checking it is clear of obstruction, and having already selected the appropriate airway adjunct and size, now insert the adjunct back to front (Pilbery & Lethbridge, 2016) with the bendy part, named ‘the body’ (Beattie, 2005), curved towards the patient’s upper lip and nose. Once the adjunct has reached the soft palate, rotate it 180 degrees and advance it (Pilbery & Lethbridge, 2016). It should now rest in the pharynx (Pilbery & Lethbridge, 2016).
Article 999’s own or licenses purchased via Adobe Stock & Dreamstime
Final note.
Why is it so important to size the adjunct? Because ‘If the airway [device] is too long it may occlude the airway by […] displacing the epiglottis; if too short it will not separate the soft palate or tongue from the posterior wall of the pharnyx’
Gregory, P. & Mursell, I. 2010. ‘Airway management’ in Manual of Clinical Paramedic Procedures, Sussex: Blackwell Publishing, pp. 2-34
This post has been peer reviewed by at least one other individual. Let us know what you think in the comments below.